3D Editor
To adjust your product's position, color, camera viewpoint, and thumbnail image, please follow the steps below.
This applies to both mobile and PC environments.
Access Path:
EVOVA Dashboard > Top Right Button > [3D Showroom] > [List] > Click Individual Product
How to Use Viewer Settings
1. Preview (Mobile / PC)
- Before changing settings, you can preview how it will look on mobile / PC screens
- It's essential to check the ratio and presentation by alternating between the two environments as they appear on actual screens
 Image 1. EVOVA Showroom Preview
2. Open 3D Editor
- To adjust position, color, camera viewpoint, thumbnail image, etc., please open the 3D Editor.
EVOVA Dashboard > Top Right Button > [3D Showroom] > [List] > Click Individual Product > [Open 3D Editor]
 Image 2. EVOVA Showroom 3D Editor
3-1. 3D Editor - Transform Settings (Position, Rotation, Scale)
[Open 3D Editor] > [Transform Settings]- You can adjust the size, position, and rotation of the 3D object
 Image 3. EVOVA Showroom Transform Settings (Position, Rotation, Scale)
- 3D Model Position: Move the product in Left/Right (X) / Up/Down (Y) / Front/Back (Z) directions
- 3D Model Rotation: Rotate the product based on X, Y, Z axes to adjust to front view or desired angle
- X-axis: Used when moving the product left ↔ right
- Y-axis: Used when moving the product up ↑ or down ↓
- Z-axis: Used when moving the product closer ↔ farther from the screen or rotating
- 3D Model Scale: Adjust the overall size of the product displayed on screen
- After configuration, click the
[Apply]button to reflect changes, and use[Reset]to restore to original state if needed.
3-2. 3D Editor - Color Settings (Brightness, Color Settings, Advanced Settings (Saturation, Gamma, etc.))
[Open 3D Editor] > [Color Settings]- You can adjust the color and effects of the 3D object
 Image 4. EVOVA Showroom Color Settings (Brightness, Color Settings, Advanced Settings (Saturation, Gamma, etc.))
- Brightness
- Brightness: Adjust the overall illumination of the product. Higher values make it brighter, lower values make it darker
- Contrast: Adjust the difference between bright and dark areas to create a sharper image
- Color Settings
- Red: Emphasize or reduce the red tone of the product
- Green: Adjust green tone
- Blue: Adjust cool feeling or blue tint
- Advanced Settings
- Saturation: Adjust color vividness. Lower values approach grayscale
- Gamma: Correct midtones by adjusting the overall brightness curve
- Hue: Change the overall color family (e.g., red family → blue family)
- Vibrance: Suitable for subtle color adjustments compared to basic saturation
- Highlight: Adjust emphasis on bright areas
- Shadow: Adjust depth of dark areas
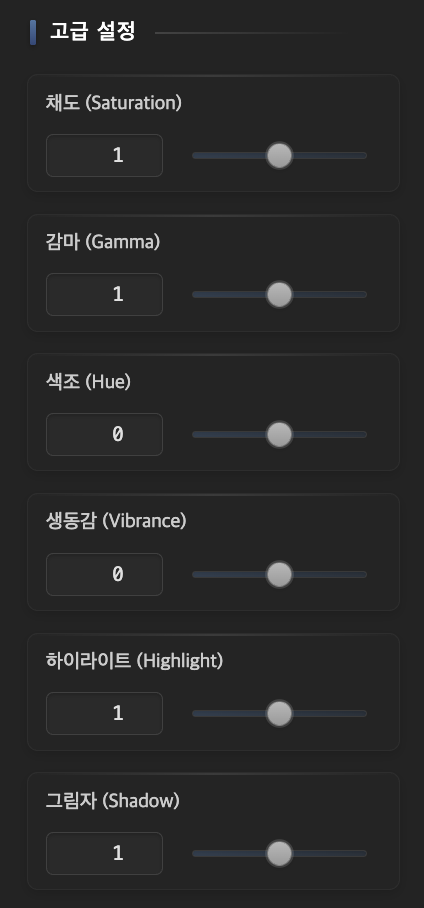 Image 5. EVOVA Showroom Color Settings (Advanced Settings Only)
- After configuration, you must click the
[Save]button to apply changes. To revert to the previous state, click[Restore], or to completely reset to initial state, click[Reset]. Note that you must click[Save]for final application in this case as well.
3-3. Camera Settings
[Open 3D Editor] > [Camera Settings]- Adjust camera position and view parameters
 Image 6. EVOVA Showroom Camera Settings
- Camera Type
- Object Camera
 Image 7. EVOVA Showroom Camera Type - Object Camera
- Space Camera
 Image 8. EVOVA Showroom Camera Type - Space Camera
- First-Person View Camera
 Image 9. EVOVA Showroom Camera Type - First-Person View Camera
- Camera Position Adjustment
- Adjust the camera angle centered on the product by changing X (left/right), Y (height), Z (distance) values
 Image 10. EVOVA Showroom Camera Position Adjustment
- Distance Limit, Rotation Angle Limit Guide
- Min/Max Distance Limit: Set how close the camera can get to the product (zoom in/out effect)
- Top/Bottom Rotation Angle Limit: Set the angle at which the product can be viewed from above/below
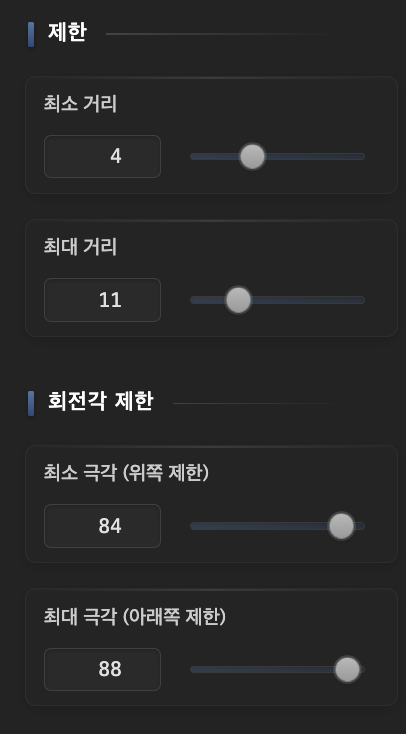 Image 11. EVOVA Showroom Camera Limits
- Rendering & Controller Settings Guide
- Field of View (FOV): Adjust the width of the visible field in 3D space. Lower values create a more focused viewpoint, higher values create a wide and open viewpoint. (Default: 50)
- Near Clipping: Prevent objects too close to the camera from being cut off from the screen. Higher values show only objects farther away, lower values show all objects including close ones. (Default: 0)
- Pan Speed: Adjust the response speed when moving left/right, up/down with the mouse. Lower values allow slower movement and more precise control (Default: 0.5)
- Moving Speed: Set the movement speed when rotating the view with keyboard (WASD, etc.) or touch. (Default: 1)
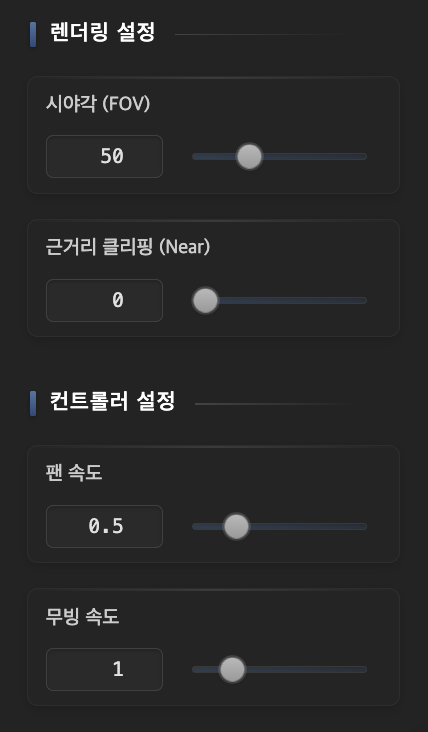 Image 12. EVOVA Showroom Rendering & Controller
- After configuration, you must click the
[Save Camera Settings]button to apply changes. Check the ratio difference by alternating between mobile / PC versions in the preview. These camera settings can also affect the thumbnail image, so it's good to plan the screen you want to present together with the thumbnail in advance.
4. Change Thumbnail Image
This thumbnail is used in the 3D Showroom list and dynamic loading screen.
- Click
[Choose File]→ Select the image to use as thumbnail - Click
[Upload Selected Image]→ Upload the image - After refreshing the page, click
[View Registered Image]→ Confirm the changed thumbnail
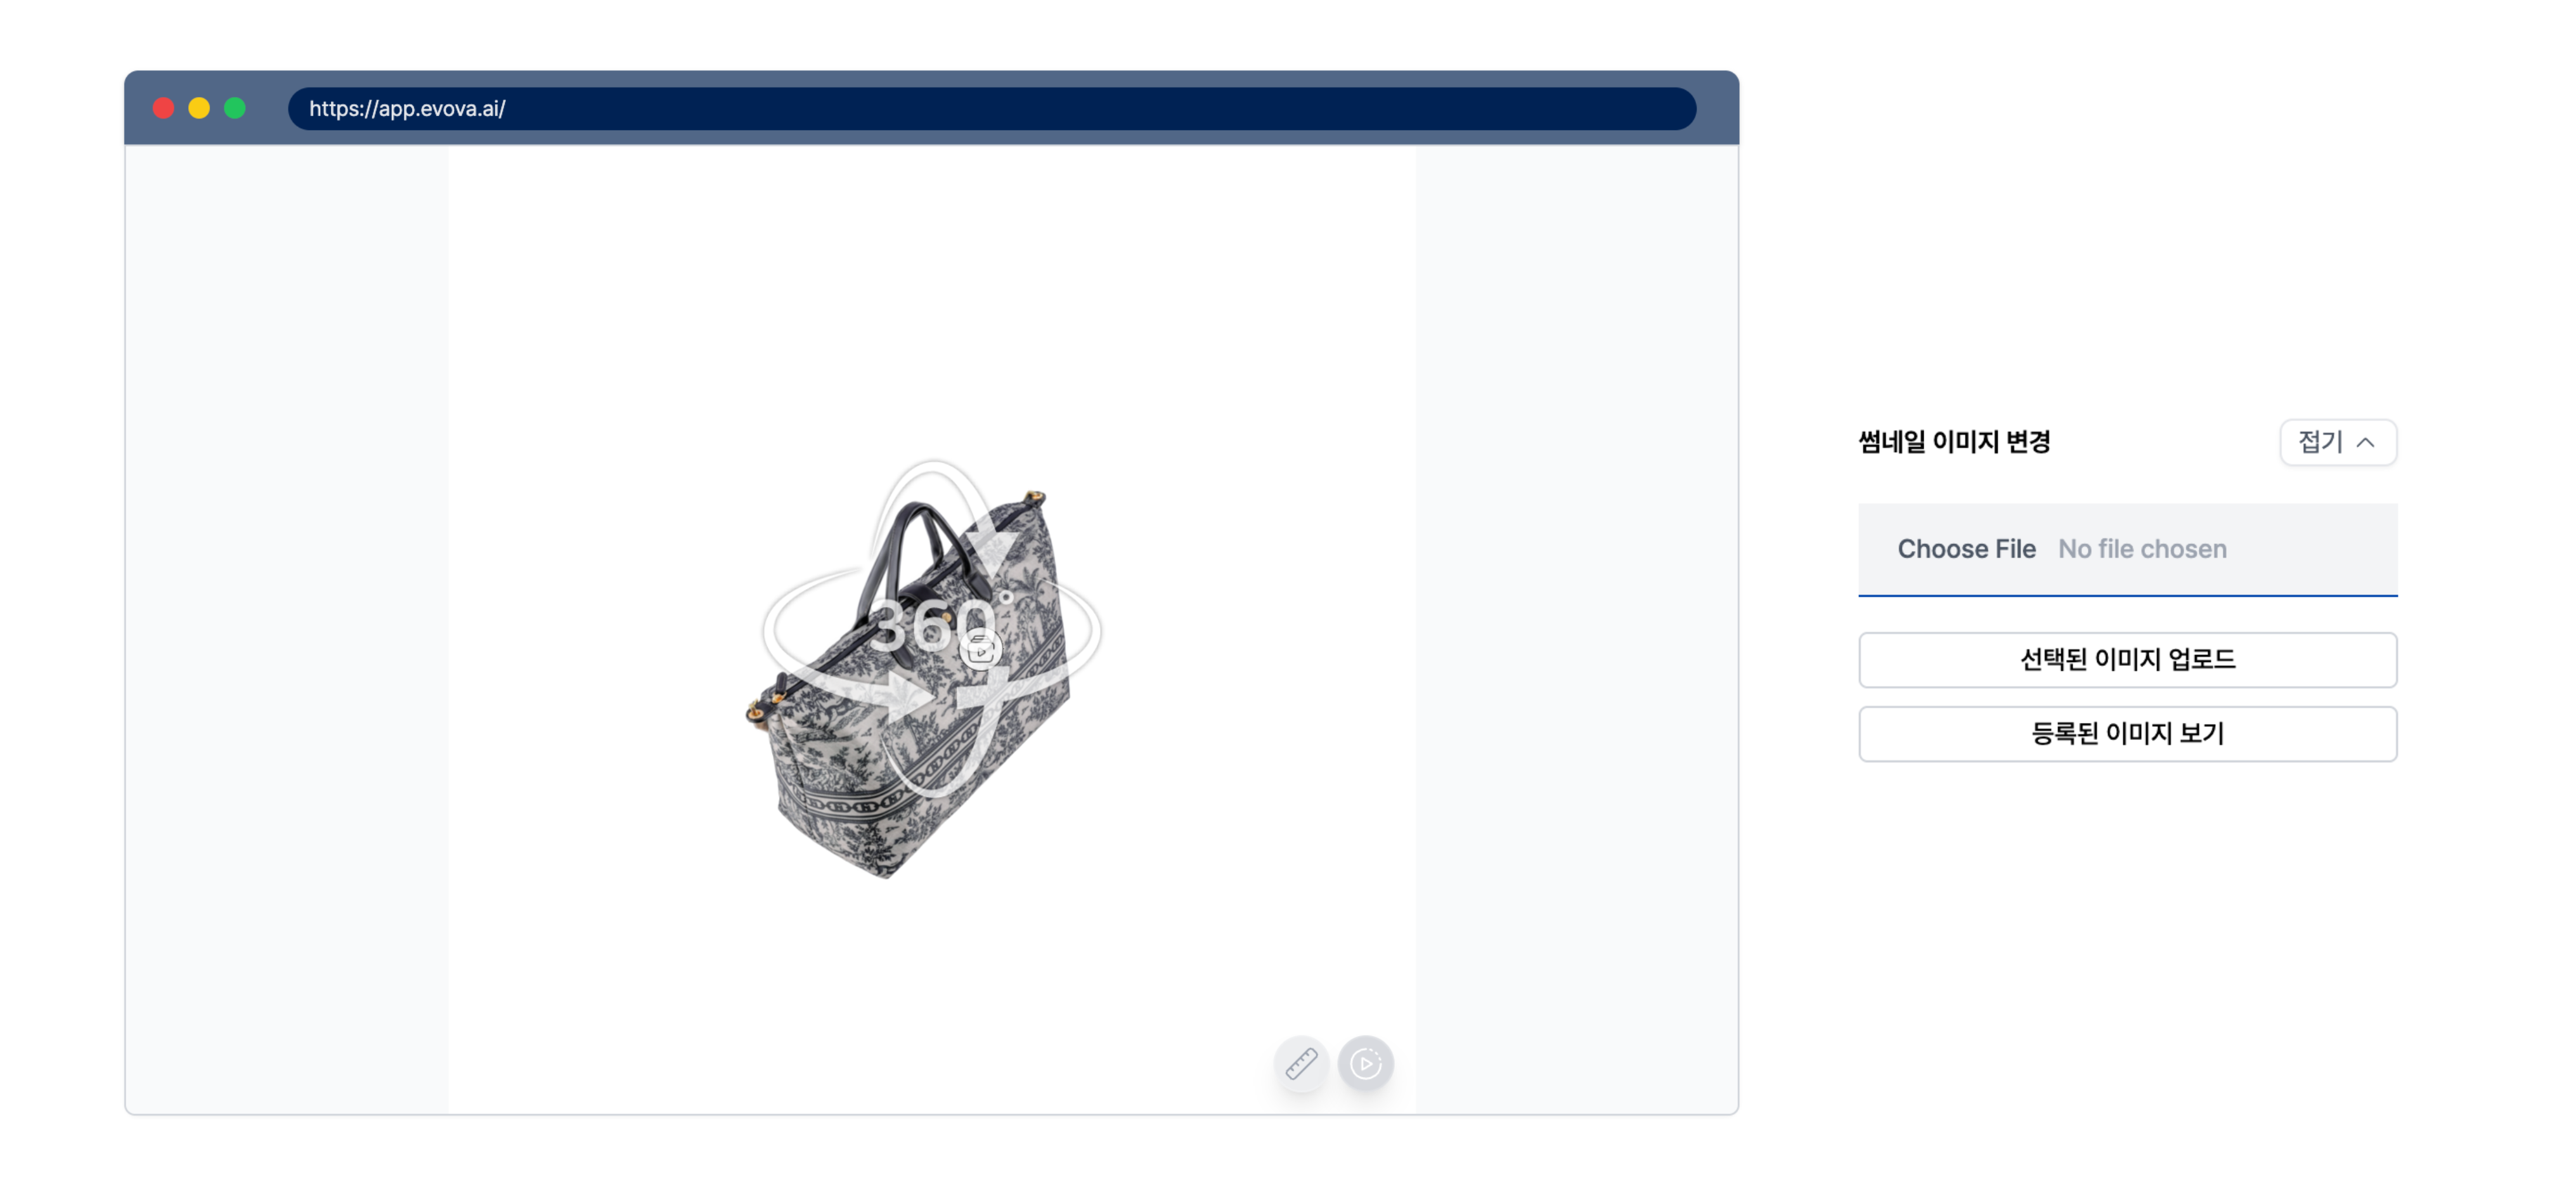 Image 13. EVOVA Showroom Thumbnail Modification
- To change the thumbnail image:
- First, click the
[Choose File]button to select an image again - Click the
[Upload Selected Image]button below - Refresh the page
- Click the
[View Registered Image]button - You can confirm the changed thumbnail
- First, click the
Closing
Adding Dimensions to E-commerce
EVOVA is always here to help make your brand experience more stable and special.
If you have any questions, please feel free to contact our support team.
Email: info@metown.co.kr
Phone: 010-6650-6300